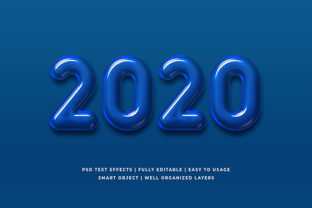
Blue Bold Detailed 3D Text Effect Mockup
If you’ve ever spent hours layering shadows, bevels, and gradients in Photoshop—only to end up with flat-looking text that fails to grab attention—you’re not alone. The Blue Bold Detailed 3D Text Effect Mockup solves that problem elegantly: it’s a ready-to-use, high-resolution PSD file that transforms plain typography into striking, dimensional blue text with realistic lighting, depth, texture, and perspective—all in one click.
Designers, marketers, educators, and small business owners use it for social media banners, presentation slides, YouTube thumbnails, product packaging concepts, and branded course materials. Its appeal lies in its balance: bold enough to command attention, detailed enough to feel premium, and blue-toned enough to convey trust, clarity, and professionalism—without requiring advanced 3D modeling skills.
Common Missteps—and Why They Cost Time, Credibility, or Cash
Many people treat mockups like plug-and-play shortcuts—but the Blue Bold Detailed 3D Text Effect Mockup only delivers value when used thoughtfully. Here’s where things often go off track:
Assuming “blue” means one fixed shade
Not all blues behave the same under different lighting or backgrounds. A mockup built around #0066CC may look vibrant on white but vanish against navy or get lost in a busy photo background. Some users drop the effect onto low-contrast images without adjusting layer blending modes—or worse, skip checking how the blue renders in CMYK for print. That leads to mismatched brand colors, inconsistent marketing assets, or rework after client feedback.
Better approach: Before finalizing, preview your text over actual background contexts—light, dark, textured, photographic. Use Photoshop’s Proof Colors (View > Proof Setup) to simulate how the blue translates across devices and output formats. If your brand uses a specific Pantone, verify whether the mockup’s blue aligns—or if you’ll need to adjust the base color layer manually.
Overlooking smart object limitations
Most high-quality Blue Bold Detailed 3D Text Effect Mockups rely on Smart Objects to preserve editability. But here’s what’s easy to miss: resizing a Smart Object beyond 120% of its original dimensions can blur fine surface details—especially subtle bevels, noise textures, or specular highlights. Users trying to stretch the effect across a full-width website hero banner sometimes discover pixelation only after export.
Better approach: Always check the mockup’s included documentation for native canvas size and recommended scaling limits. When you need larger output, duplicate the Smart Object layer, rasterize one copy, and apply Preserve Details 2.0 (in Image > Image Size) before enlarging—not after. Or better yet: start with a mockup designed for your target use case (e.g., “social media square” vs. “billboard vertical”).
Treating lighting as static—not situational
The “detailed” part of the Blue Bold Detailed 3D Text Effect Mockup includes carefully crafted light direction, ambient occlusion, and shadow falloff. Yet many users leave those layers untouched—even when placing text over a sunset photo lit from the lower left. The result? A jarring visual contradiction: light hitting the text from above while the background glows from below.
Better approach: Open the mockup’s layer group and locate folders labeled “Light,” “Shadow,” or “Highlights.” These are typically non-destructive adjustment layers or masked duplicates. Tweak their opacity, blend mode (try Overlay or Soft Light), or even rotate their layer masks to match your background’s dominant light source. It takes two minutes—and makes the effect feel integrated, not pasted.
Skipping font compatibility checks
Mockups often include placeholder text using system fonts like Arial or Montserrat. But if you swap in a custom script font with tight kerning or tall ascenders, the 3D extrusion may clip letters or distort spacing. Worse, some users paste in variable fonts without disabling optical sizing—causing inconsistent stroke weight across characters.
Better approach: Before typing your headline, double-click the placeholder layer thumbnail to open the linked Smart Object. Inside, test your intended font at actual size. Adjust tracking (+10 to +30 is typical for bold 3D treatments), and ensure baseline alignment matches the mockup’s anchor point. If the font lacks true bold or condensed variants, consider pairing it with a complementary web-safe fallback inside your design system.
What to Verify Before Downloading or Buying
Not all Blue Bold Detailed 3D Text Effect Mockups are created equal. Before adding one to your cart or library, ask yourself:
- Is the PSD fully layered? Avoid flattened files—even if they look sharp. You’ll need individual control over extrusion depth, material finish (matte vs. glossy), and ambient shadow intensity.
- Does it include real-world context scenes? A mockup showing text on a laptop screen, notebook cover, or office wall helps you visualize scale and integration—far more than a blank gray canvas.
- Are source files editable in your version of Photoshop? Some newer mockups use features only available in CC 2023+. Check compatibility notes—especially if you’re on an older subscription or using Photoshop Elements.
- Is licensing clear for your use? Most allow commercial use for client projects, but verify whether unlimited redistribution (e.g., bundling in a Canva template shop) is permitted—or requires an extended license.
A Realistic Example: From Generic to Polished
Say you’re designing a webinar banner for a cybersecurity workshop. You grab a Blue Bold Detailed 3D Text Effect Mockup, type “Secure Your Data,” and export. It looks okay—but the blue feels cold, the shadows are too harsh, and the text competes with the background lock icon.
Now try this instead: Lower the “Ambient Light” layer opacity to 65% to soften contrast. Change the “Front Material” layer blend mode from Normal to Linear Dodge (Add) for a crisper highlight. Then, add a subtle Hue/Saturation adjustment clipped to the text layer—boosting blue saturation by +8 and lightness by +3 to warm the tone just enough. Finally, nudge the shadow layer mask 5px right to echo the direction of light in your background graphic.
Same mockup. Better outcome. No extra plugins. Just intentional layer awareness.
The Blue Bold Detailed 3D Text Effect Mockup isn’t magic—it’s a well-crafted tool. Its power multiplies when you understand how its parts interact with your content, context, and goals. Take time to explore its layers. Test it across real scenarios. Adjust—not just apply. That’s how “detailed” becomes distinctive, and “bold” becomes believable.